


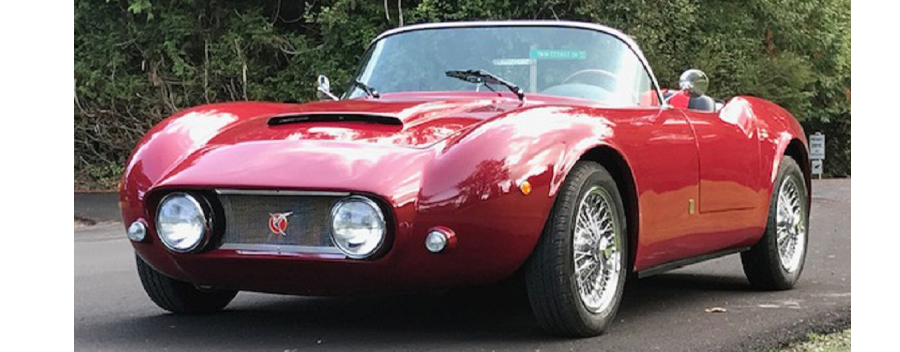
The Simpson Design “Swift” – The Latest Custom Design By Jim Simpson and Company
Hi Gang…
I’ve admired the work that has come from Simpson Design several years before I got the chance to talk with and meet Jim Simpson. Since that day, Jim and I have been fast friends and on several occasions he has honored us with articles here at Undiscovered Classics. Today is another one of those occasions.
Jim’s article today is about his latest sports car – the Simpson Design Swift. It’s been featured in several magazines and a YouTube video or two, and now we are sharing its story here with you. So without delay, take it away Jim 🙂
The Simpson Design Swift Project
By Jim Simpson
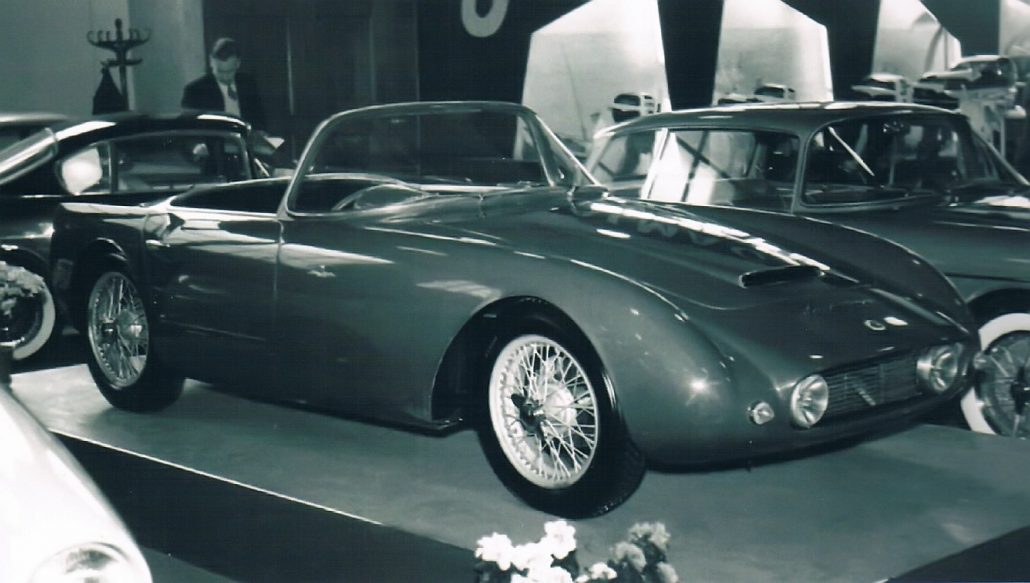
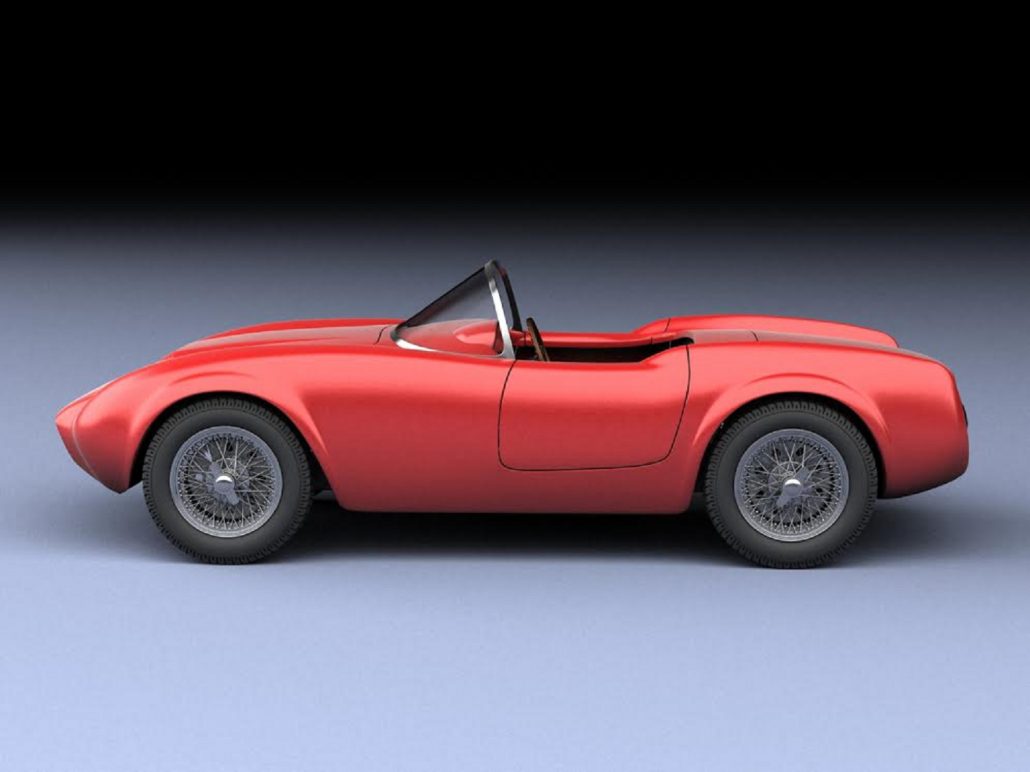
1957 Lotus Eleven by Ghia Aiglie (Michelotti)
I have always been a huge fan of the Michelotti designed 1957 Lotus XI that was ultimately built by Ghia Aigile of Switzerland, so much so that about 4 years ago I decided to scratch build a 1/24 scale model of the car for my model collection. Making the model renewed my general fascination for the design and I couldn’t resist posting some pics of the model on Facebook in some of the car groups I belong to.

Jim Simpson’s Model of the Lotus Eleven Designed by Michelotti
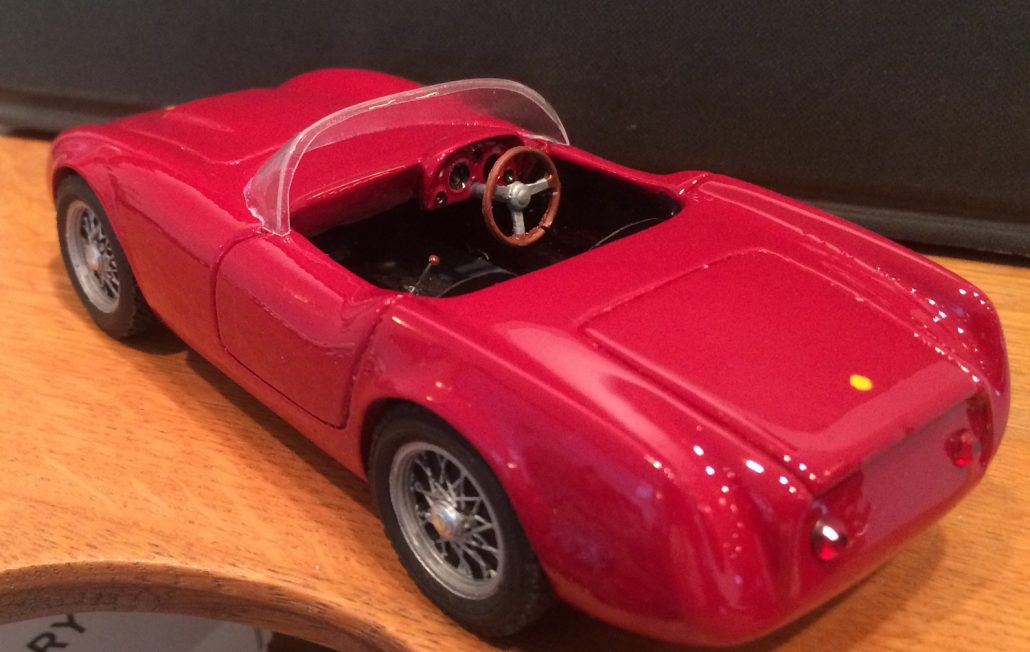
A 3D programmer friend of mine, Dan Palatnik, who lives in Brazil, saw the model pics and sent me an email, offering to do a virtual model of the car for me, should I ever get serous about building one. On a lark I sent some pictures to my best overseas client, who, without hesitation, said, “Yes, I would like one – could you build it for me, please? A few emails back and forth confirmed that he was quite serious and so the project began.
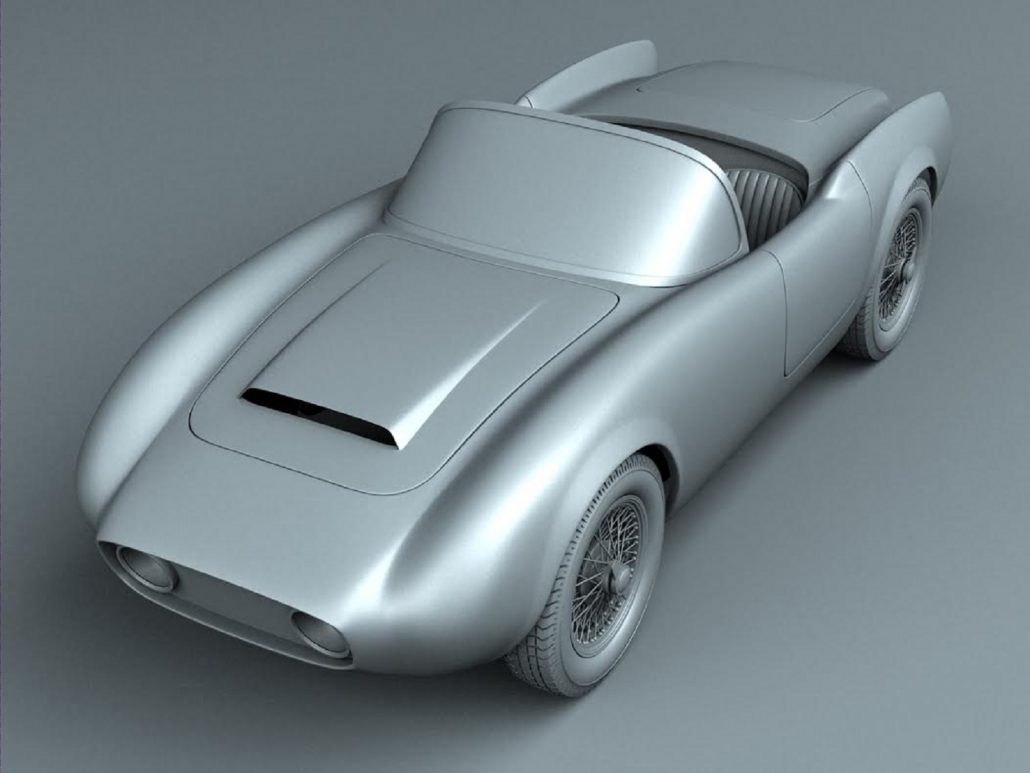
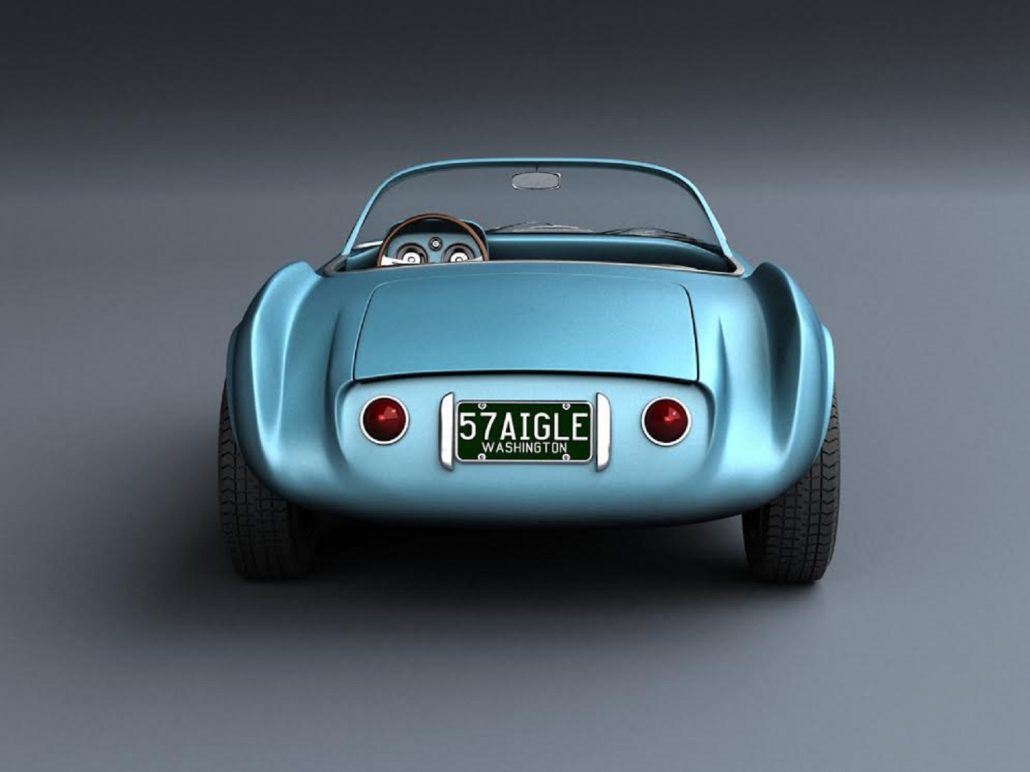
Dan Palatnik’s Renderings Start with a Colorless Shell. After the Shape is Confirmed, Color is Applied
I made a second model and sent it to Dan, who immediately set about creating the preliminary drawings, which we then modified to give us a uniquely Simpson design. I then contracted with Dan to make a 3d station buck model. A good friend of mine, Raffi Minassian, another profession automotive designer and also an Industrial arts professor in San Francisco, who took Dan’s 3D renders and had them wood laser cut for us.
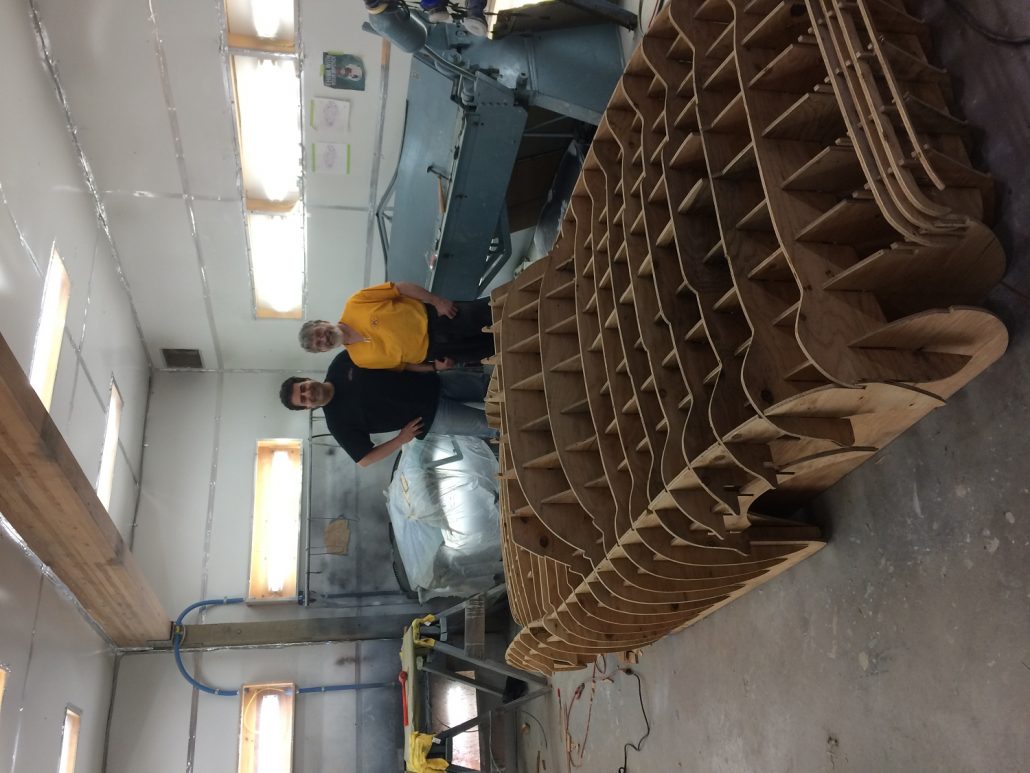
From Left To Right: Raffi Minasian and Jim Simpson
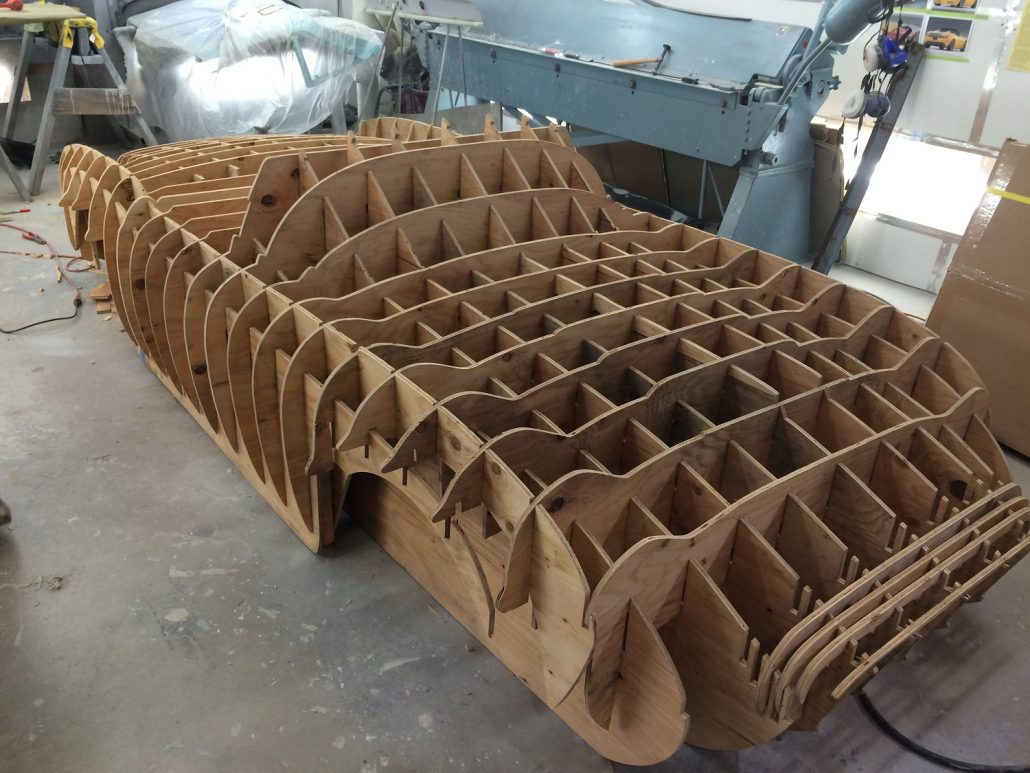
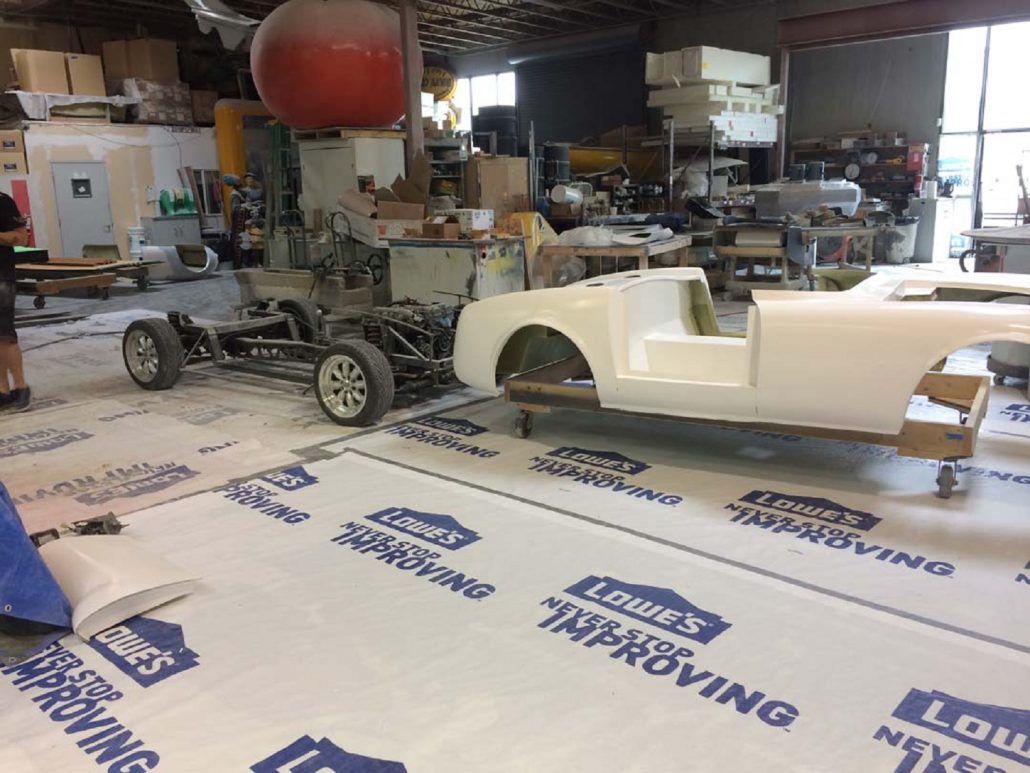
This let us build a 1/5 scale model to make sure the buck would work. Raffi and I spent a fun day assembling the 1/5 scale model. Raffi, my associate JR and I later assembled a full sized water jet cut plywood buck also created from Dan’s 3D program. Never having done a full sized body this way, it was an interesting learning curve. In the end, I decided that skinning the wooden buck in steel was the answer.
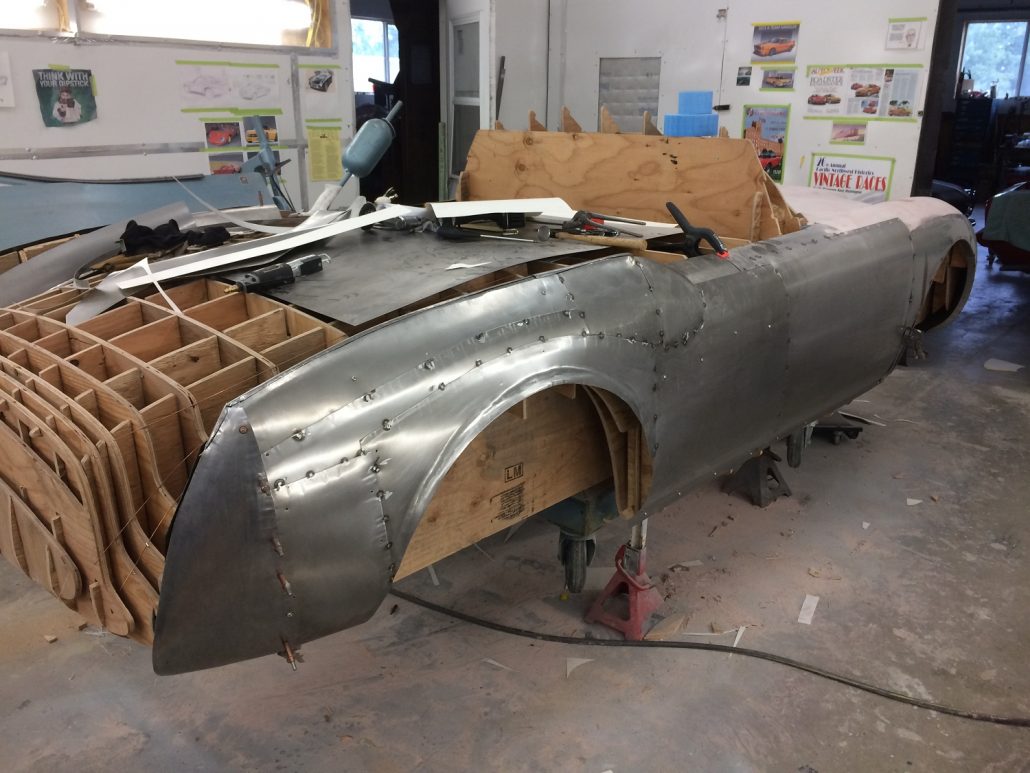
Once completed, I had the guys over Sunbacker Fiberglass in Monroe WA, whom we’ve used for years, produced a set of working tooling for us to lay up a composite body and interior tub.
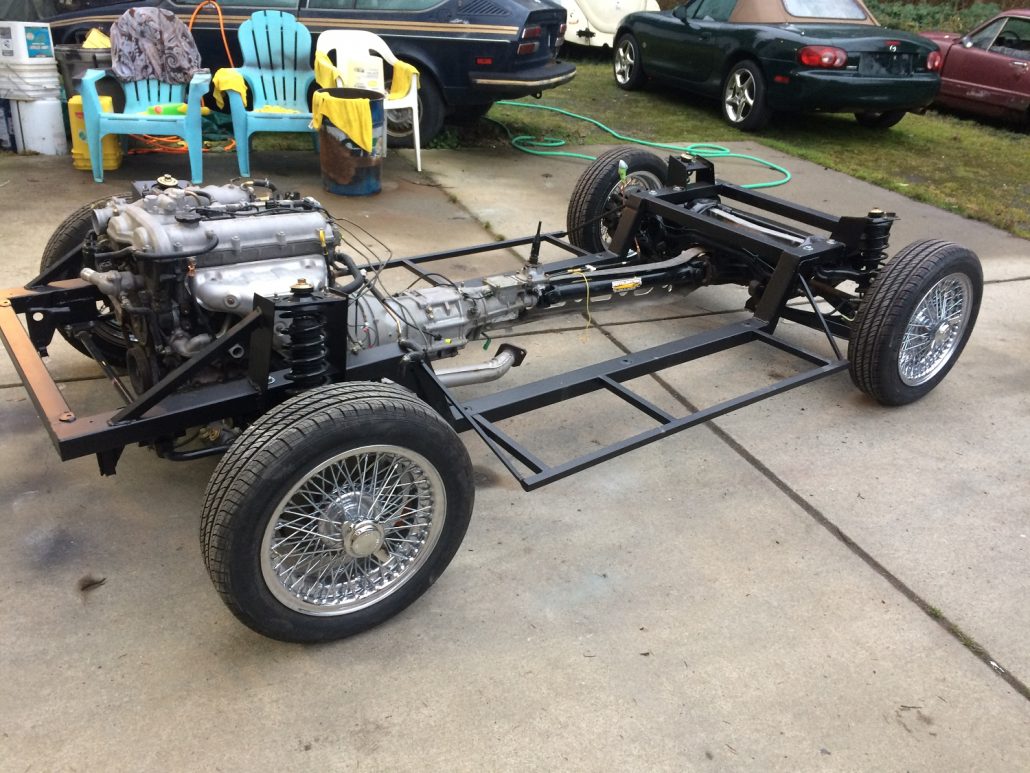
In the meantime I scratch built a 2nd chassis in mild steel, designed to use the subframes and driveline from a second generation Mazda Miata, except shortened by 2 inches, giving us an 88“ wheel base. On completion, we took it over to Sunbacker on the trailer, fitted it to the first body Sunbacker had made – amazingly, the two actually fit together – and we proceeded to bring the whole lot back to the shop for additional development.
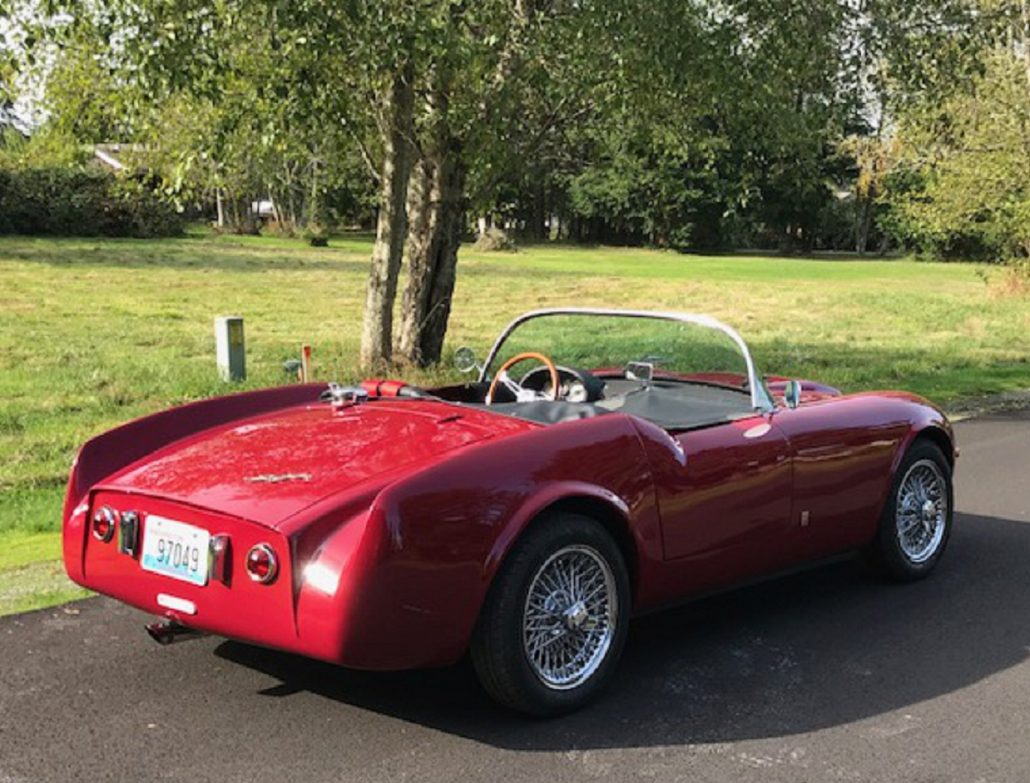
I kept looking at the windshield opening. In some way it was familiar. I called up my glass supplier and asked him if he could get me engineering drawings and specs on a 58-62 Corvette windscreen. He laughed and said, “I can more easily get you a windshield tomorrow.” So I ordered a glass, which arrived the next day as advertised. Much to my amazement it was within a quarter inch of fitting, proving that every now and then an old dog gets lucky.
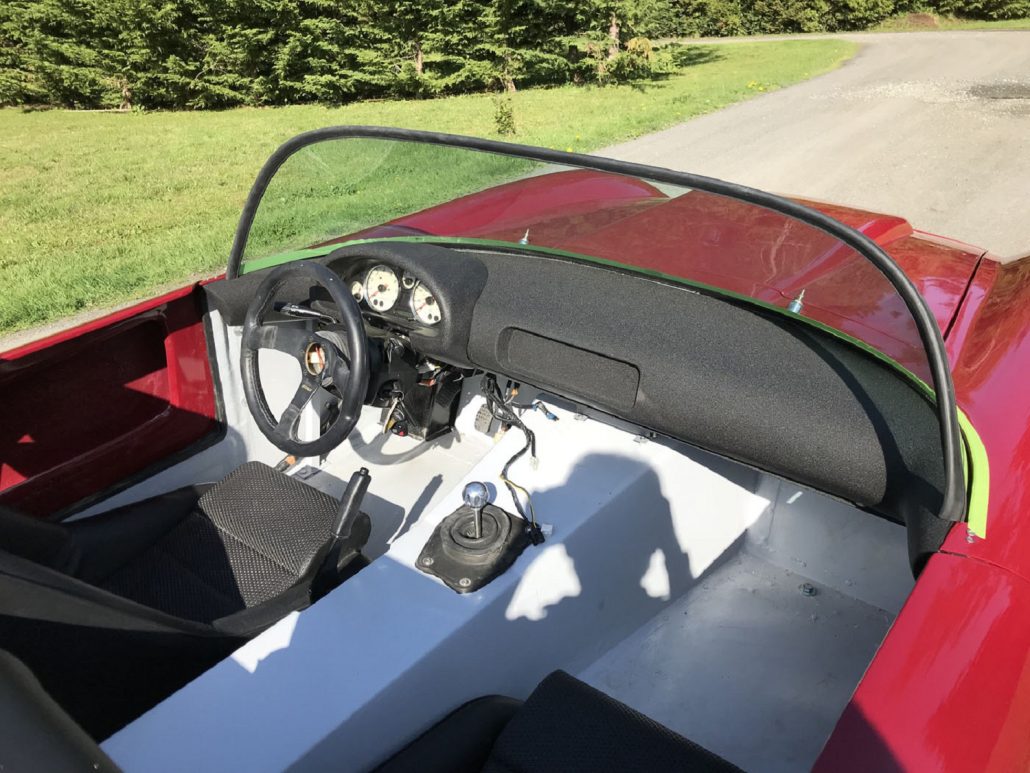
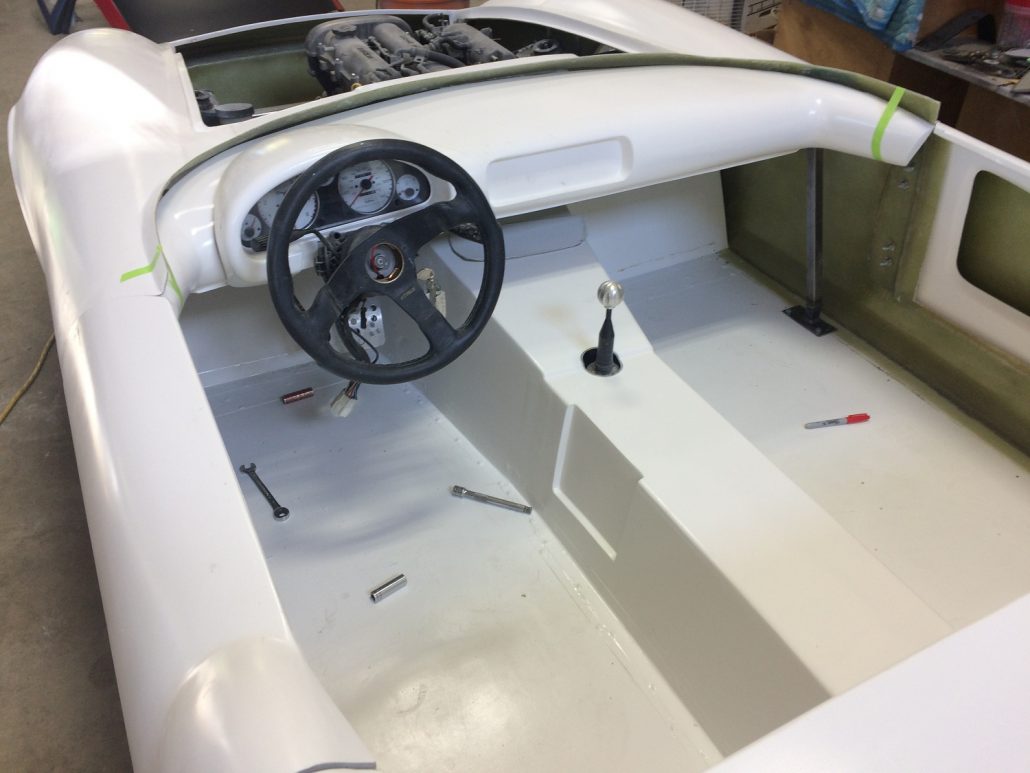
We decided to attach the windshield in a trough below the cowl, affixing it with butyl Rubber in the same as most modern windshields. The guys over in Monroe were as always ready to help, and made us a trough for the windscreen to sit down into the cowl, giving us a way to attach it to the car. We had a custom rubber extrusion made to trim out the top edge and an alloy channel made to go over the rubber extrusion to trim it all out. Continuing on with parts development, before long I had created a dashboard from steel and filler.
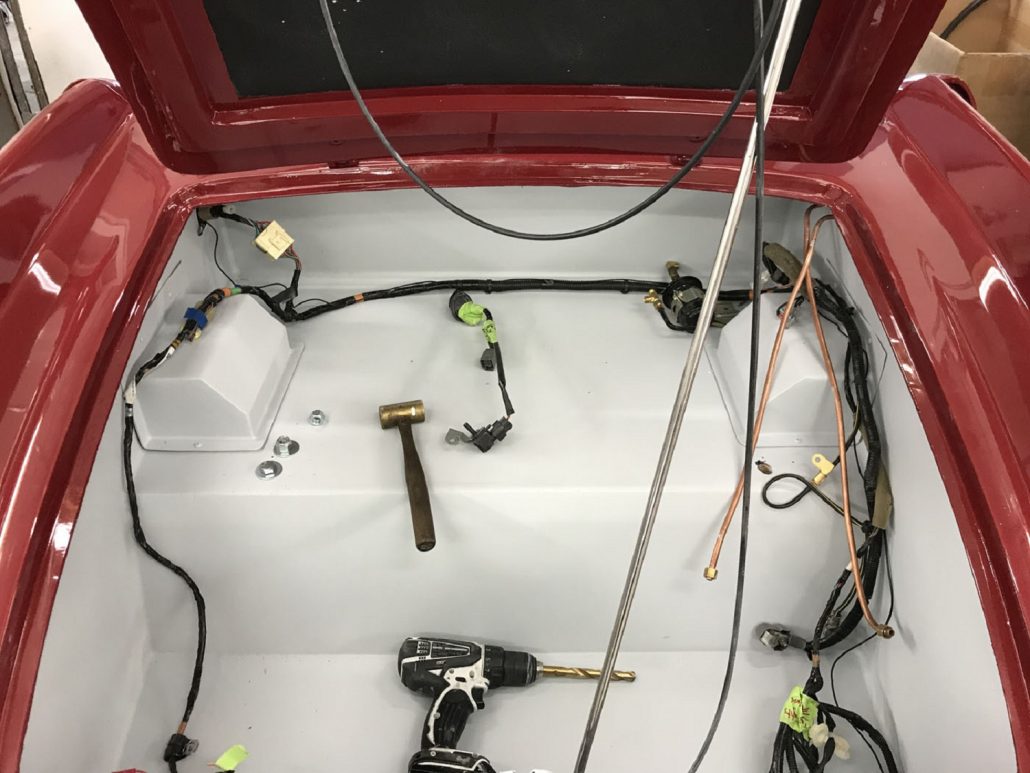
Next we had to close in the side areas in the foot well so I made up steel side panels for masters to be reproduced in fiberglass. Next we needed to make doors, hood and trunk lid inner to be made along with molds for inner parts. A few weeks later all this and molds had been created. I decided to utilize as many parts from the Mazda Miata as possible so hood hinges and door hinges were modified to work with the car. Fuel tank and fuel delivery system became another challenge, so we had an alloy fuel tank made.
I took the fuel sender and pump assembly from a Miata tank and modified them to work in the new aluminum tank. Not wanting to recreate some of the explosive disasters of car maker history, we moved the tank from just above the rear sub frame (in Miata fashon) into the trunk just behind the rear seat bulkhead. This would be fitted out with one of the Cobra style competition fuel fillers on the rear cowl just in front of the trunk lid.

Our client would want the electronic fuel injection and instrumentation as well as switch assemblies so we stripped the wiring out of the Miata donor car and heavily modified it. I wanted to keep the wire wheels as a period nod to the Lotus street cars of the day even though we were not making a replica, and after purchasing numerous Dunlop wire wheel hubs, I was finally able to arrive at one we could lightly machine to work on the car, giving it that vintage British look. I chose a set of 15” 72 spoke wire wheels with polished stainless spokes.
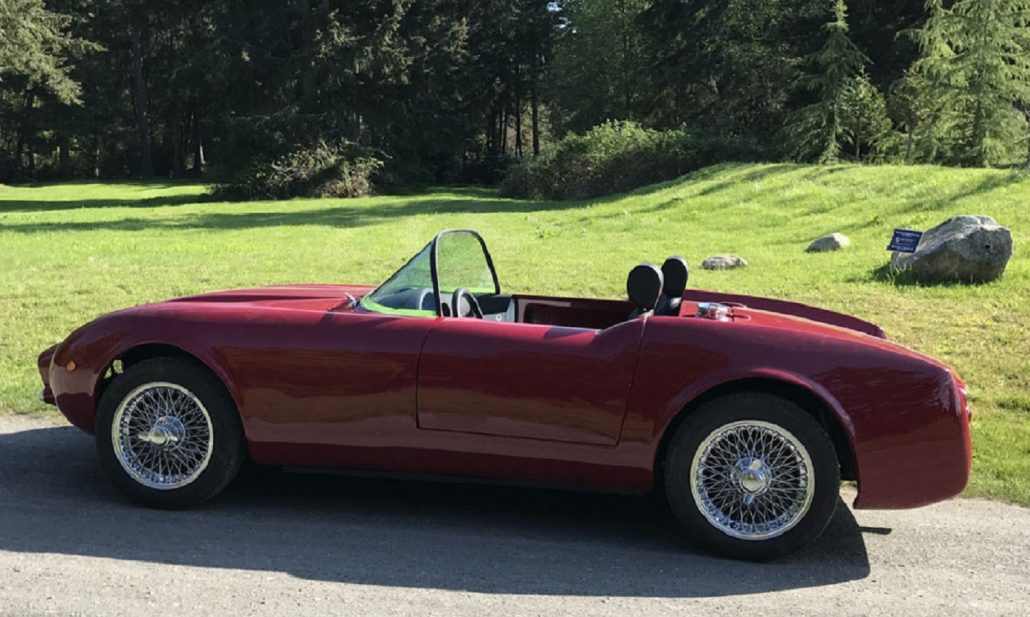
These were basically the wire wheel replacements for the 6 cylinder MGC’s. All rough assembled, the car looked great overall but there was something missing – it needed distinctive badging. My son Chuck Simpson helped me develop the badging for the car and we had it manufactured. The front and side emblems are very old school in that they are chromed steel with cloisonne (colored glass melted into the reliefs).
We purchased lovely seats, reminiscent of Fulvia HF seats, from Italy and had the interior trimmed out in leatherette to match. We did a simple smooth leatherette inside the doors, very much in the older British roadster style, and diamond stitching on the tunnel, giving the tunnel some padded noise deadening and a bit of elegance. Another throw back feature, the very light weight dash was painted in black wrinkle finish common in many street and competition cars of the day.
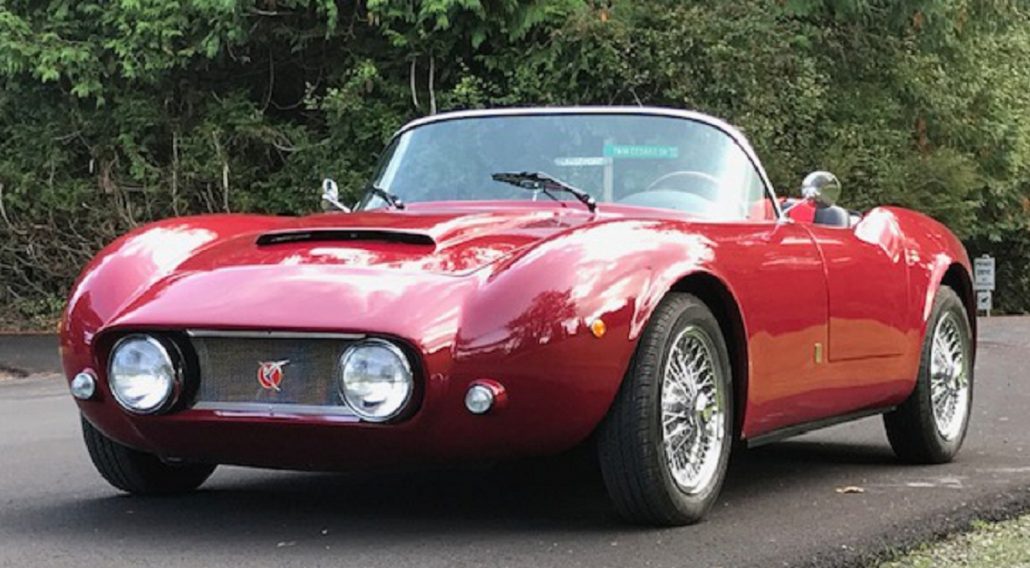
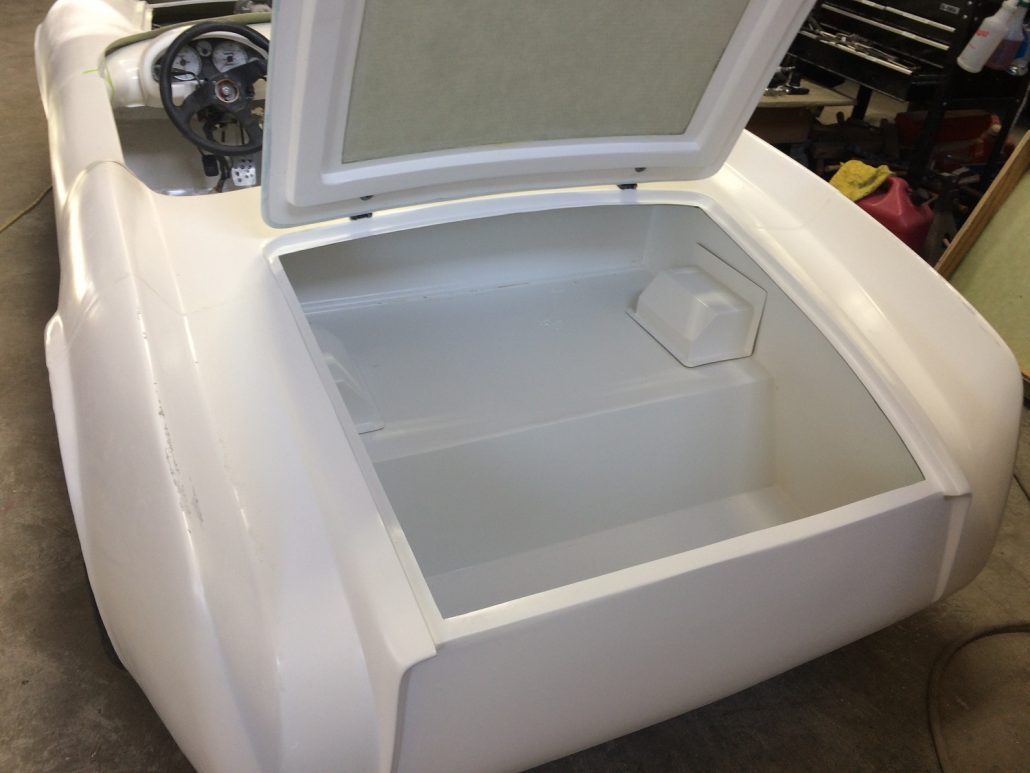
We also had a black full tonneau cover made for the interior, which could easily be tucked behind the seats or run as a half cover. The tonneau was held in place by an assortment of snaps and TenEx fasteners. The trunk, or ‘boot’ as the British would say, was carpeted and given leatherette sides and trim work. The finished Swift is probably a bit more finished than the Michelloti car of the 50’s. Weight on our 88” wheel base little car is just under 1400 lbs. Right at 140 Hp from the emissions legal engine propels the car to 60 MPH in the mid 3 second range. The Swift proves the point that at the end of the day, performance is about horsepower to weight ratio, and it does all this while running on regular and getting close to 50MPG.
Summary:
Thanks again to Jim Simpson for sharing today’s article. Those that want to learn more about the Swift and other Simpson Design sports cars can click on the link below:
Click Here To Learn More About Simpson Design Sports Cars
And if you would like to review additional articles by Jim Simpson that have been shared here, click on the link below:
Click Here To View Articles by Jim Simpson Here at Undiscovered Classics
Hope you enjoyed the story, and remember…
The adventure continues here at Undiscovered Classics.
Geoff
Where do I get a body? I love it and I am a big fan of Miatas. I have owned 3. 2NAs and I drive an NC. That is an amazing drive train that will last for a very long time and is easy and cheep to fix/modify.
It is very similar to the Lancia Blue Ray II by Michelotti/Vignale except in convertible form.